
G37 HID Headlight Bulb Replacement
The following directions can be utilized in the replacement of HID bulbs in the 2007 and later Infiniti G-series sedan or the 2008+ G37 sport coupe. One person can accomplish this task with no problems. Please view pictures with steps for additional detailed information.
NOTE: The following was performed on a 2007 Infiniti G35s sedan with AFS so the headlight assembly will look different from the back on base-level vehicles.
|
Tools needed: Car jack, Tire Iron, small flat head screwdriver, flashlight or external light source
|
|
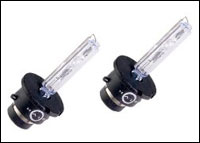 |
The Infiniti G35 and G37’s utilize D2S HID bulbs. These bulbs fit into the headlight housings in a certain
direction based off a key pattern that is part of their base. Bulb orientation has the bulbs power wire in the "down" position, thus this "bar"
will be on the bottom when installed. When handling the bulbs, DO NOT touch the bulb as oil from your fingers will shorten their life. |
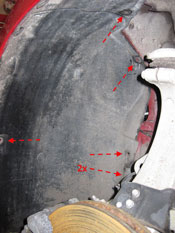 |
Step 1. Safely jack up the car and remove the tire. This step could be optional but access is
much easier with the wheel removed. To access the headlight assemply the fender liner must be moved out of the way. The liner may be fully
removed with additional steps but simply folding it out of the way is the easiest. As per the image to the left, use the small flathead screwdriver
to remove the retaining clips as listed in the picture. On the bottom right there is a plastic plate with 3 fasteners (as shown in this exploded
view in the A window), go ahead and remove this. Be careful with the fastners as they are known to break.
NOTE: It is advisable to remove the negative battery terminal before starting this process. IMO, it is optional.
|
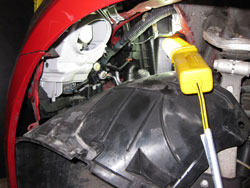 |
Step 2. Fold the fender liner out of the way to give you access to the headlight assembly.
Optionally you can remove the whole fender liner but to do so you will need to remove the bolt under the bottom of the fender along with
approximately 5 other 10mm bolts under the car. Too much effort and not needed for this task.
|
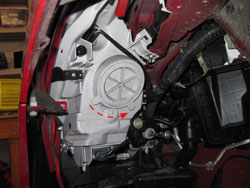 |
Step 3. The white cap in the picture needs to be removed. This can be accomplished by
twisting the cap counter clockwise. Set the cap aside.
|
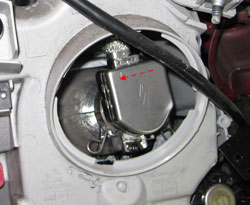 |
Step 4. The steel box is the bulb socket. Remove it by turning it counter clockwise and move it out of the way.
The most difficult part of the installation seems to be figuring out how to disengage the retaining clip from the HID bulbs. In the picture you see two rings on each
end of this clip that need to be disengaged. You will need to depress each "hooked" end of the ring inward (toward the front) and slide inward to toward the
bulb. This can be difficult to remove and reinstall thus others have elected to remove the top screw which holds the retaining clip itself. Once each side is done,
the bulb will loosen up and you will be able to remove it. Do not touch the bulbs if you plan on using them again at a later timeframe
|
| Step 5. Time to install the new bulbs. Remove the bulbs from their packaging without touching the glass section.
To install the bulbs, use one hand to hold the retaining clip out of the way (it is hinged from the top) and
slide the bulb in. It is easiest to insert the bulb with the "power wire" on the bottom as this should align
the bulbs key. Once inserted, twist the bulb slightly left and right to ensure it is in. Move the retaining clip
over the bulb and re-engage each end of the clip (which may take some effort until you have done it once or twice). When done, make sure the bulb is flush and not at an angle
as the last thing you want to do is go back in to reseat the bulb after everything is put back together.
|
|
| Step 6. Reinstall the bulb socket, resin cap, fender liner and wheel in reverse order If you performed this task without removing the wheel you can test the the light after installing the bulb socket and lowering the car back down prior to putting everything back together.. |
|
